전편에서 이어서... 기능을 구현해보자!
각 칸의 객체
가로 세로 중 각 칸에는 이 칸이 지뢰인지 아닌지, 파졌는지 안파졌는지, 깃발이 꽂혔는지 안꽂혔는지, 지뢰가 아니라면 주면 8칸 중 지뢰가 몇개가 있는지 등 여러 정보를 필요로 한다. 그렇기에 각 칸마다 객체를 생성해서 관리해주겠다. 그리고 각 지뢰마다 좌표가 다르고 reveal, flag 두가지 상태 제어를 해야하니 이벤트를 발생시키고 제어하기 쉽도록 버튼을 생성하여 이벤트를 제어하겠다.
class Room {
    constructor(x, y) {
        this.x = x;
        this.y = y;
        this._type = "safe";
        this._isRevealed = false;
        this._isFlagged = false;
        this._hintNum = 0;
        this._element = document.createElement("button");
        this._element.classList.add("element_mine");
    }
    get type() { return this._type; }
    setType(type) { this._type = type; }
    get isRevealed() { return this._isRevealed; }
    reveal() {
        if (this._isRevealed) return;
        this._isRevealed = true;
    }
    get isFlagged() { return this._isFlagged }
    flag() { this._isFlagged = !this._isFlagged; }
    get hintNum() { return this._hintNum; }
    setHintNum(hintNum) { this._hintNum = hintNum; }
    get element() { return this._element }
}
이 객체들을 2중 배열로 만들어 관리해보자. 근데 이제 코드상에 room 들을 배열하다보면 이 배열에서 특정 좌표의 room 에 접근할 때 보통 x, y 형식의 좌표를 사용하지만 y, x 형식으로 접근해야한다.
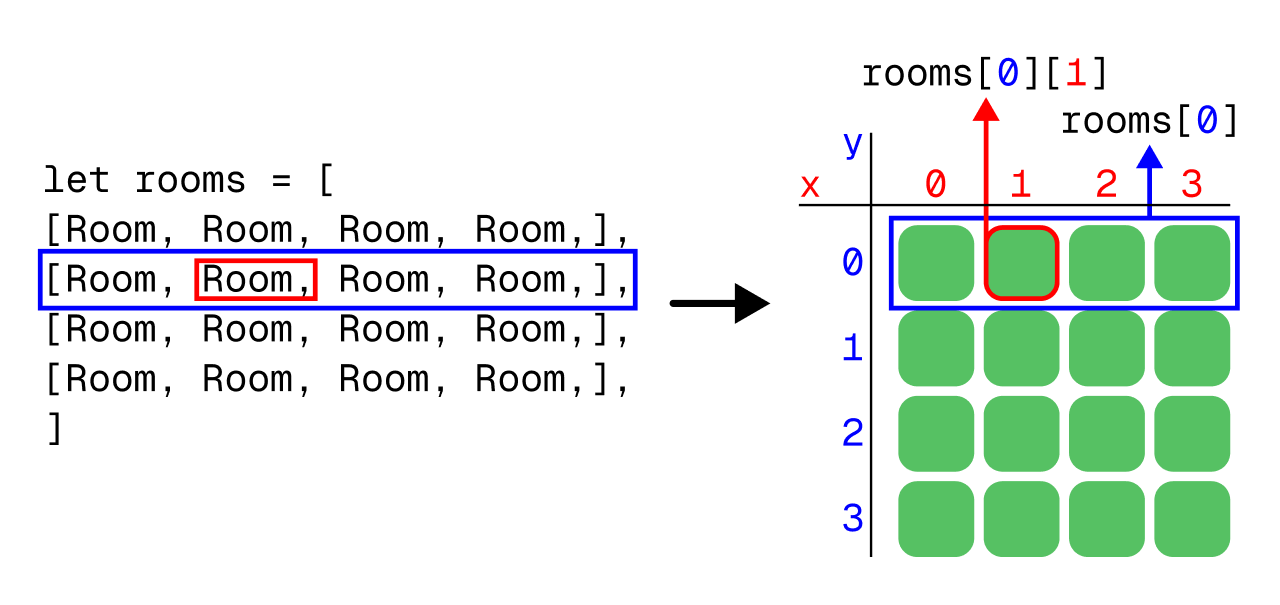 배열을 활용한 좌표체계 구성
필드 만들기
반복문을 중첩하여 필드를 구성해보자.
for (let y = 0; y < height; y++) {
    let element_row = document.createElement("div");
    element_row.className = "mine_row";
    for (let x = 0; x < width; x++) {
        let room = new Room(x, y);
        element_row.appendChild(room.element);
        mine_row.push(room);
    }
    FIELD.appendChild(element_row);
    fieldData.push(mine_row);
}
랜덤으로 좌표를 골라 해당좌표의 타입이 지뢰가 아니라면 지뢰로 설정하고 지뢰라면 재시행해서 설정한 지뢰의 총 개수만큼 지뢰를 생성해보자.
for (let i = 0; i < mine; i++) {
    let ranX = Math.floor(Math.random() * width);
    let ranY = Math.floor(Math.random() * height);
    let selectedRoom = fieldData[ranY][ranX]; //랜덤으로 지뢰가 될 칸 설정
    if (selectedRoom.type == "safe") {
        selectedRoom.setType("mine");
        //인접 지뢰 개수 종합
        for (let y = -1; y < 2; y++) {
            for (let x = -1; x < 2; x++) {
                let xx = ranX + x;
                let yy = ranY + y;
                if (xx < 0 || xx > width - 1 || yy < 0 || yy > height - 1 || (x == 0 && y == 0)) continue;
                let targetData = fieldData[yy][xx];
                targetData.setHintNum(targetData.hintNum + 1);
            }
        }
    } else { //이미 지뢰라면 재시행
        i--;
        continue;
    }
}
위 값들을 임시로 객체에서 표시하도록 해 제대로 데이터가 생성되는지 확인해보자.
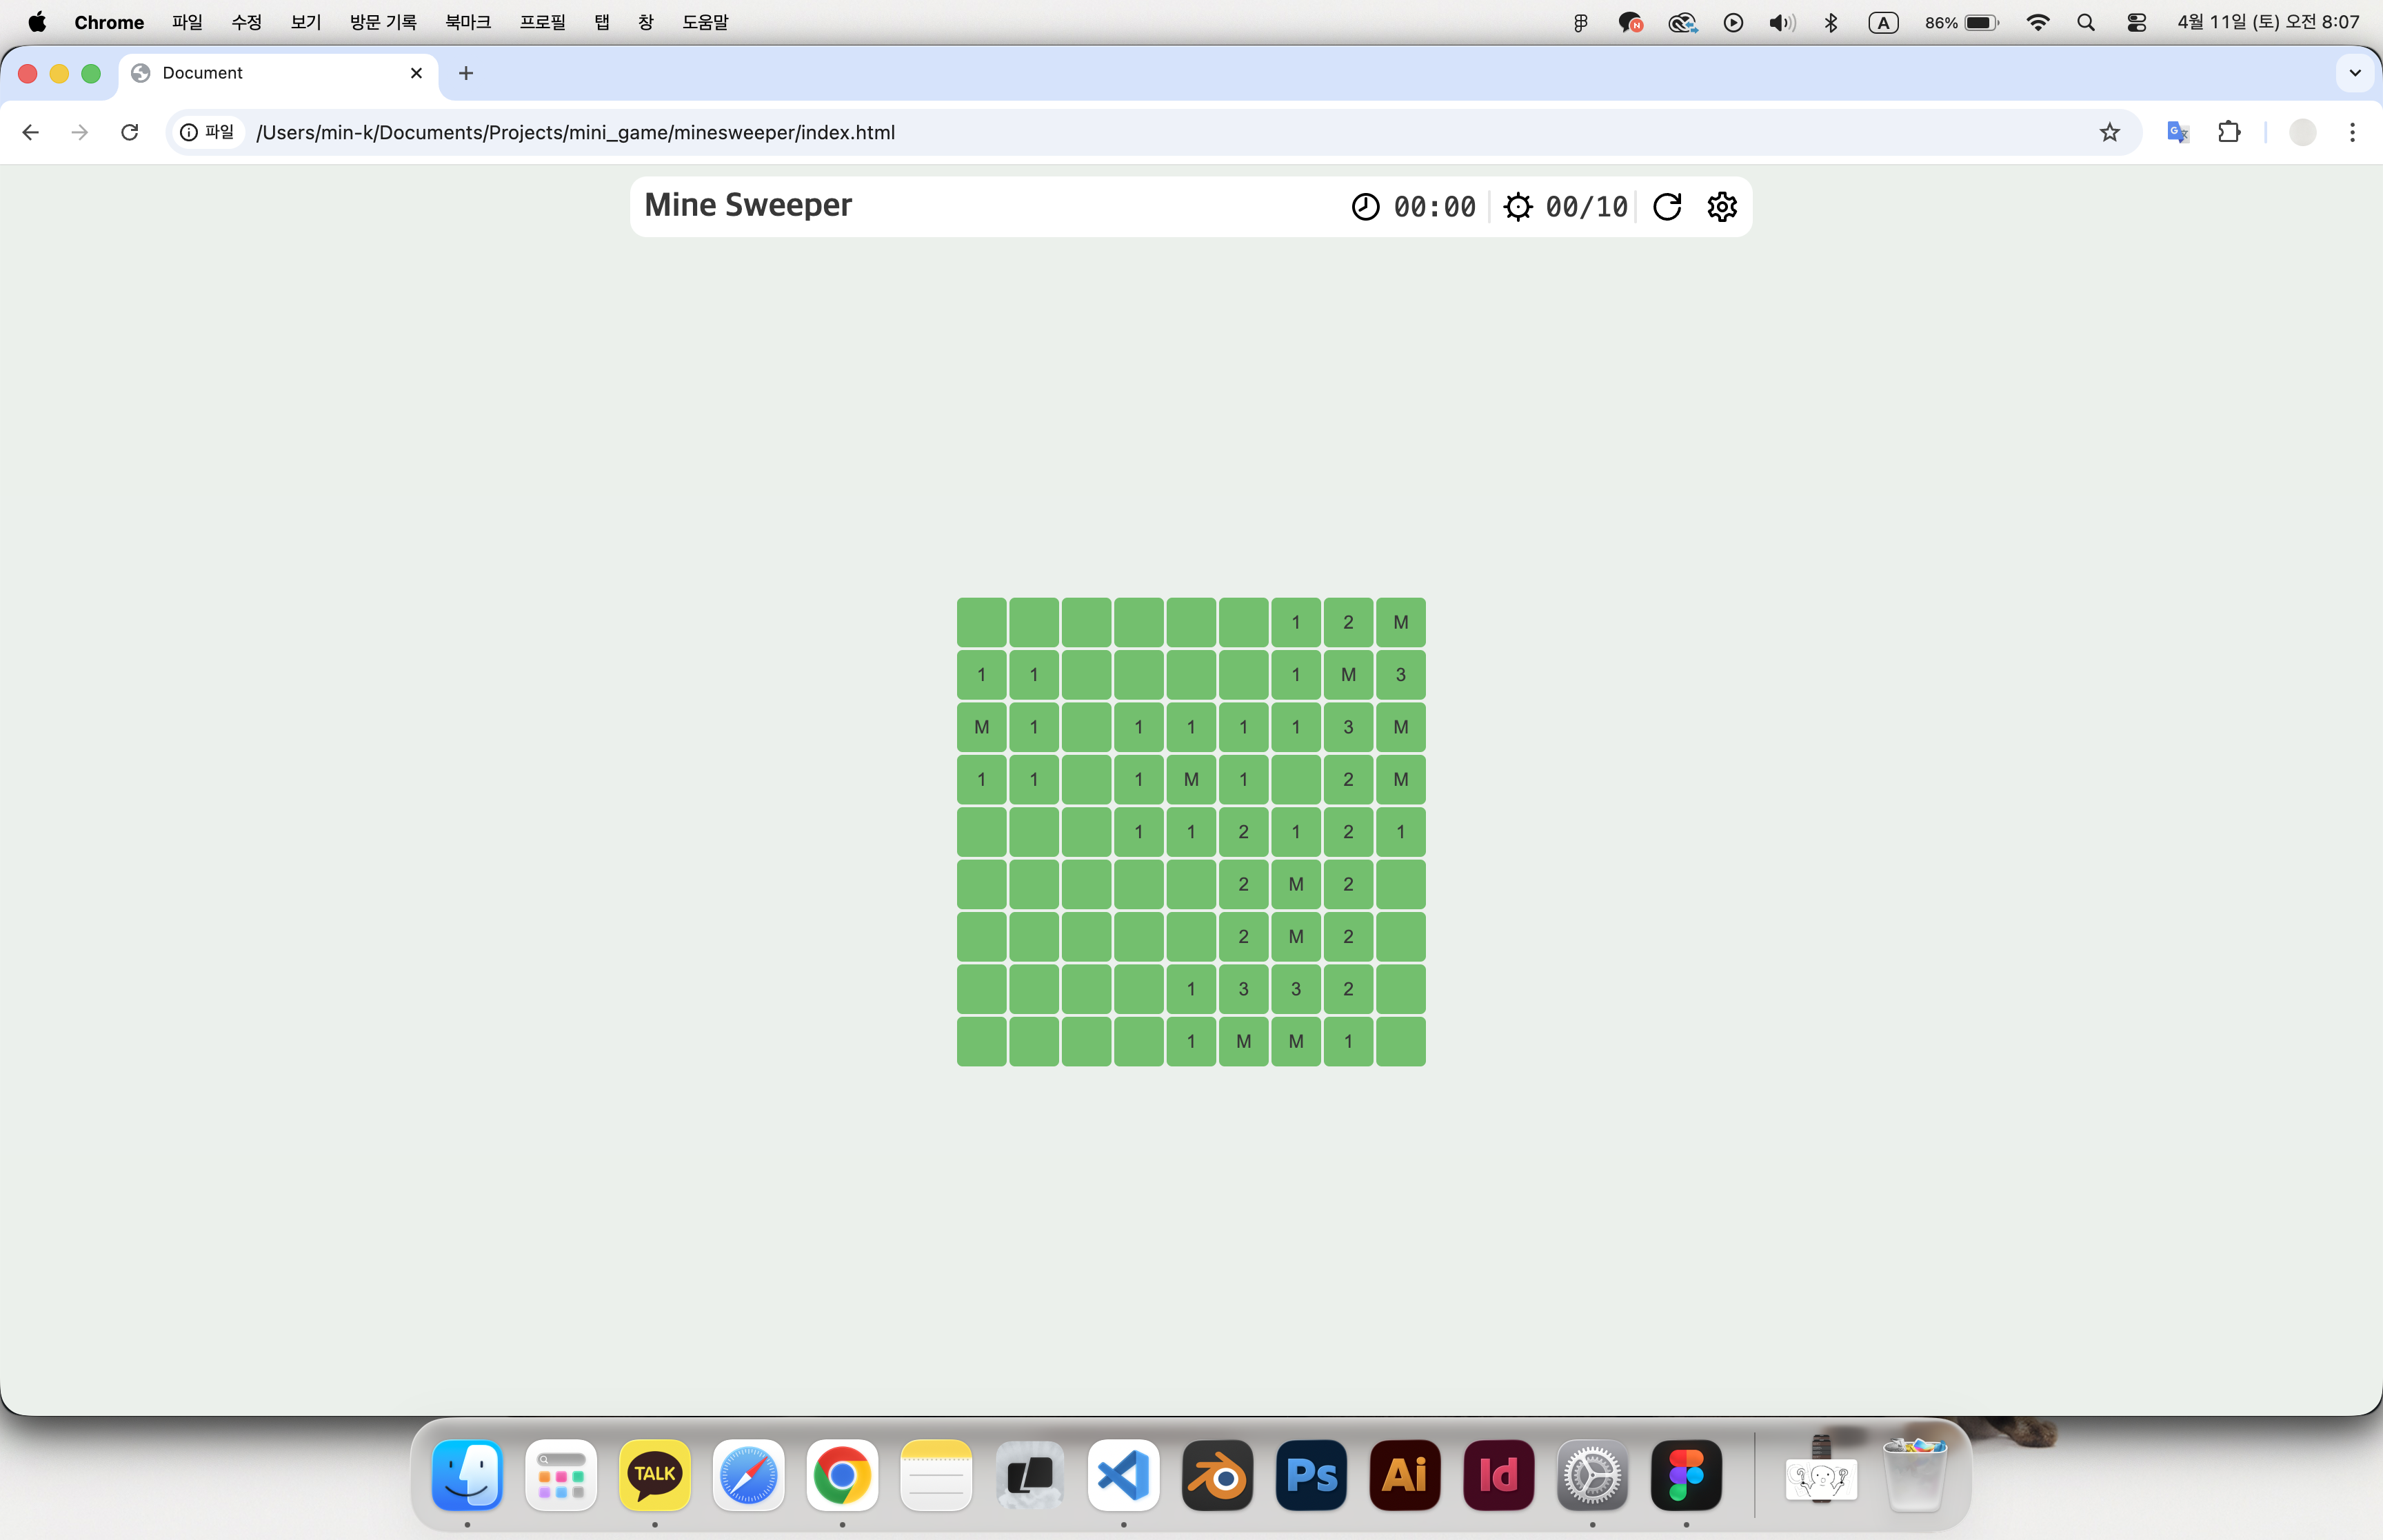 필드 구성 완료!
Room 클릭 로직 만들기
이제 각 칸을 클릭했을 때의 로직을 만들어보자.
일단 room 객체의 constructor에 버튼 클릭 리스너를 추가하자.
this.element.addEventListener("mousedown", (event) => {
    if (event.button === 0) this.reveal();
    else if (event.button === 2) this.flag();
});
좌클릭, 우클릭 모두 통제해야하니 "mousedown"의 event.button를 통해 마우스 버튼의 종류를 구분할 수 있게 했다.
| 구분 | 좌클릭 | 휠클릭 | 우클릭 |
|---|---|---|---|
| which | 0 | 1 | 2 |
이후 reveal과 flag 로직을 만들어보자.
reveal, flag 로직
isRevealed, isFlagged 둘다 거짓 상태에선 reveal과 flag가 모두 가능하지만 reveal 됐다면 되기 이전의 상태나 flag 상태로는 돌아갈 수 없어야 한다. 그리고 isFlagged가 참이라면 reveal할 수 없다.
reveal() {
    if (this.isRevealed || this.isFlagged) return;
    this._isRevealed = true;
    if (this.type === "safe") {
        this.element.style.backgroundColor = "var(--sub-primary)"
        this.element.innerText = this.hintNum;
    } else {
        this.element.style.backgroundColor = "var(--caution)";
        this.element.innerHTML = "<img src='src/mine.svg' alt='flag'/>"
    }
}isRevealed가 참이면 flag할 수 없고, isFlagged는 참 거짓 양방향 전환이 가능하다.
flag() {
    if (this.isRevealed) return;
    this._isFlagged = !this._isFlagged;
    this.element.innerHTML = this.isFlagged ? "<img src='src/flag.svg' alt='flag'/>" : "";
}
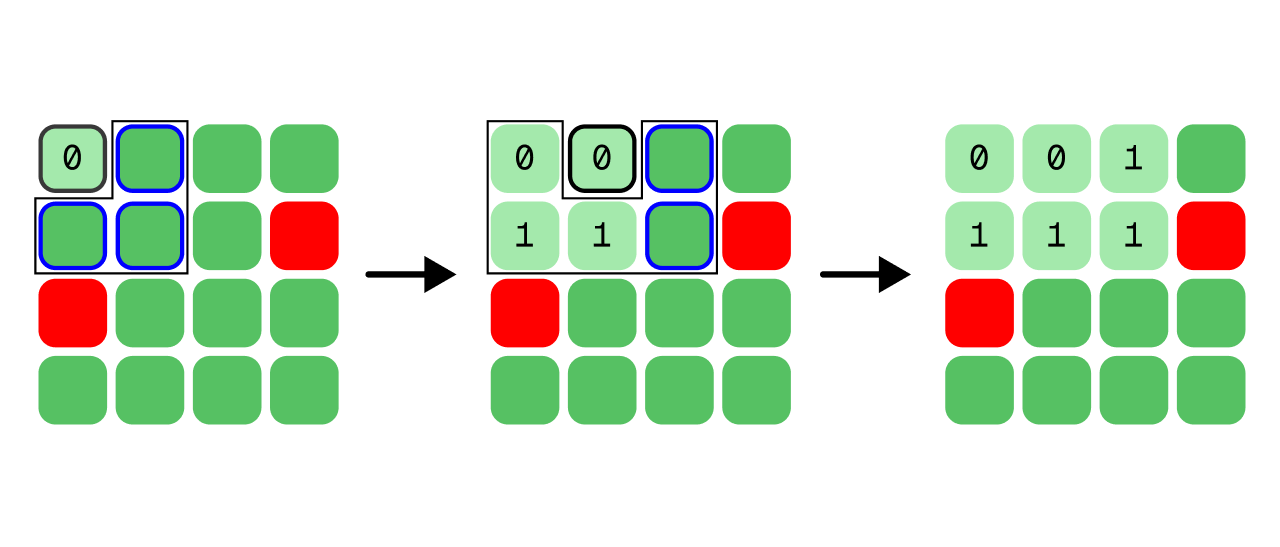
클릭한 룸이 0이라면?
지뢰찾기를 하다보면 여러개의 칸이 한번에 드러나질 때가 있을것이다. 이는 주변에 지뢰가 하나도 없는 칸을 클릭했을 때 주변에 지뢰가 1개 이상 있는 칸까지 한번에 드러나 지는것이다.
이를 구현하는 방법은 매우 단순하다.
- reveal한 룸이 0이라면?
- 내 주위 room 8개 중 reveal되지 않은 room을 모두 reveal한다.
- 그리고 각 reveal한 칸에 대해서 1번부터 다시 시행한다.
재귀함수로 간단하게 해결 가능하다.
class Room{
    ...
    reveal(){
        ...
        if (this.type === "safe") {
            ...
            if (this.hintNum === 0) openNeighbor(this.x, this.y);
        }
        ...
    }
    ...
}
function openNeighbor(x, y) {
    for (let offset_y = -1; offset_y < 2; offset_y++) {
        for (let offset_x = -1; offset_x < 2; offset_x++) {
            let target_x = x + offset_x;
            let target_y = y + offset_y;
            if (target_x < 0 || target_x > width - 1 || target_y < 0 || target_y > height - 1 || (offset_x == 0 && offset_y == 0)) continue;
            let targetData = fieldData[target_y][target_x];
            if (!targetData.isRevealed) targetData.reveal();
        }
    }
}
게임 클리어 조건
게임 클리어조건은 매우 단순하다.
- 모든 칸이 reveal 또는 flag돼있어야한다.
- flag된 칸은 모두 type이 mine일 것.
if (flagged + revealed === width * height && flagged === mine) gameClear();이 조건문을 reveal, flag할 때마다 작동하게 넣으면 된다.
타이머 만들기
게임 플레이타임을 측정하기위한 타이머를 제작해보자. 게임을 초기화 시키고 첫번째로 room을 reveal하는 순간 타이머가 시작되고 reveal한 room이 지뢰이거나 게임을 클리어하는 순간 멈추면 된다.
let isStarted = false;

class Room{
    ...
    reveal(){
        if(!isStarted){
            isStarted = true;
            setTimeout(timerStart, 1000);
        }
        ...
    }
    ...
}

function timerFunction() {
    if (!isStarted) return;
    timer++;
    DP_TIME.innerText = String(Math.floor(timer / 60)).padStart(2, '0') + ":" + String(timer % 60).padStart(2, '0');
    if (isStarted) setTimeout(timerFunction, 1000);
}

function gameOver(){
    isStarted = false;
    ...
}

function gameClear(){
    isStarted = false;
    ...
}
완성!!
마지막으로 클리어 또는 게임오버시 게임상태 표시만 대충 만들면 완성이다.
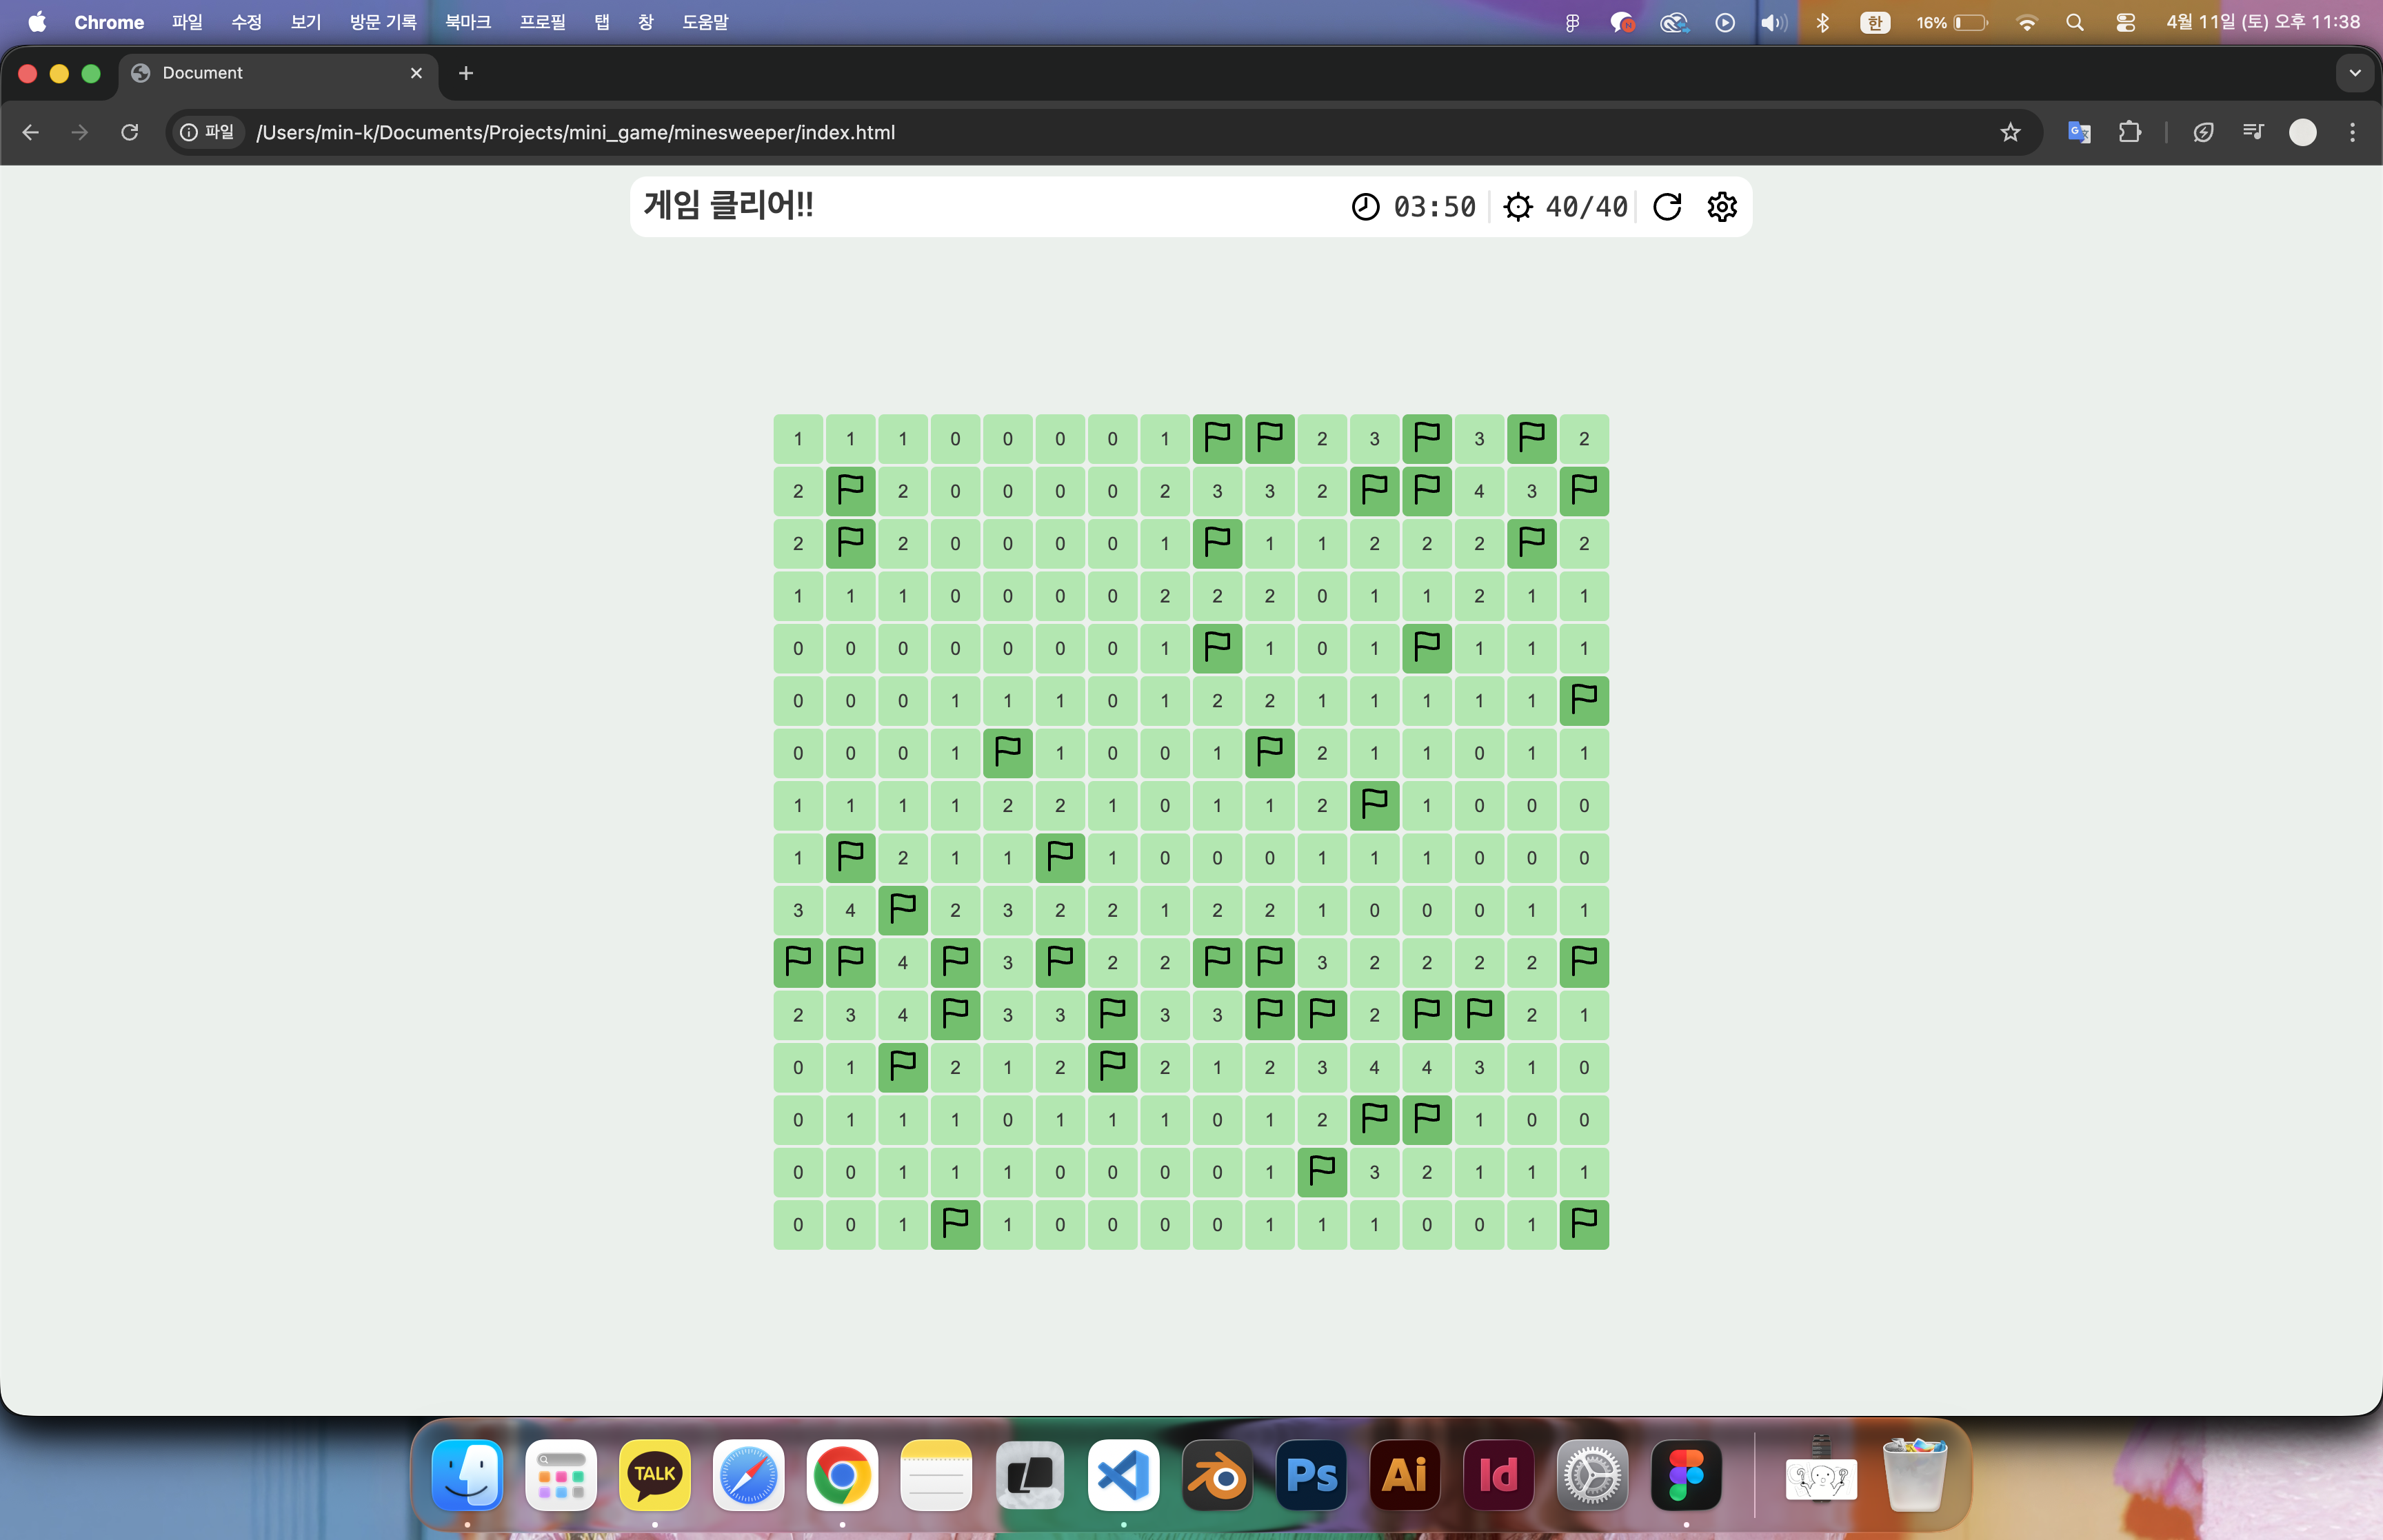 게임 클리어!
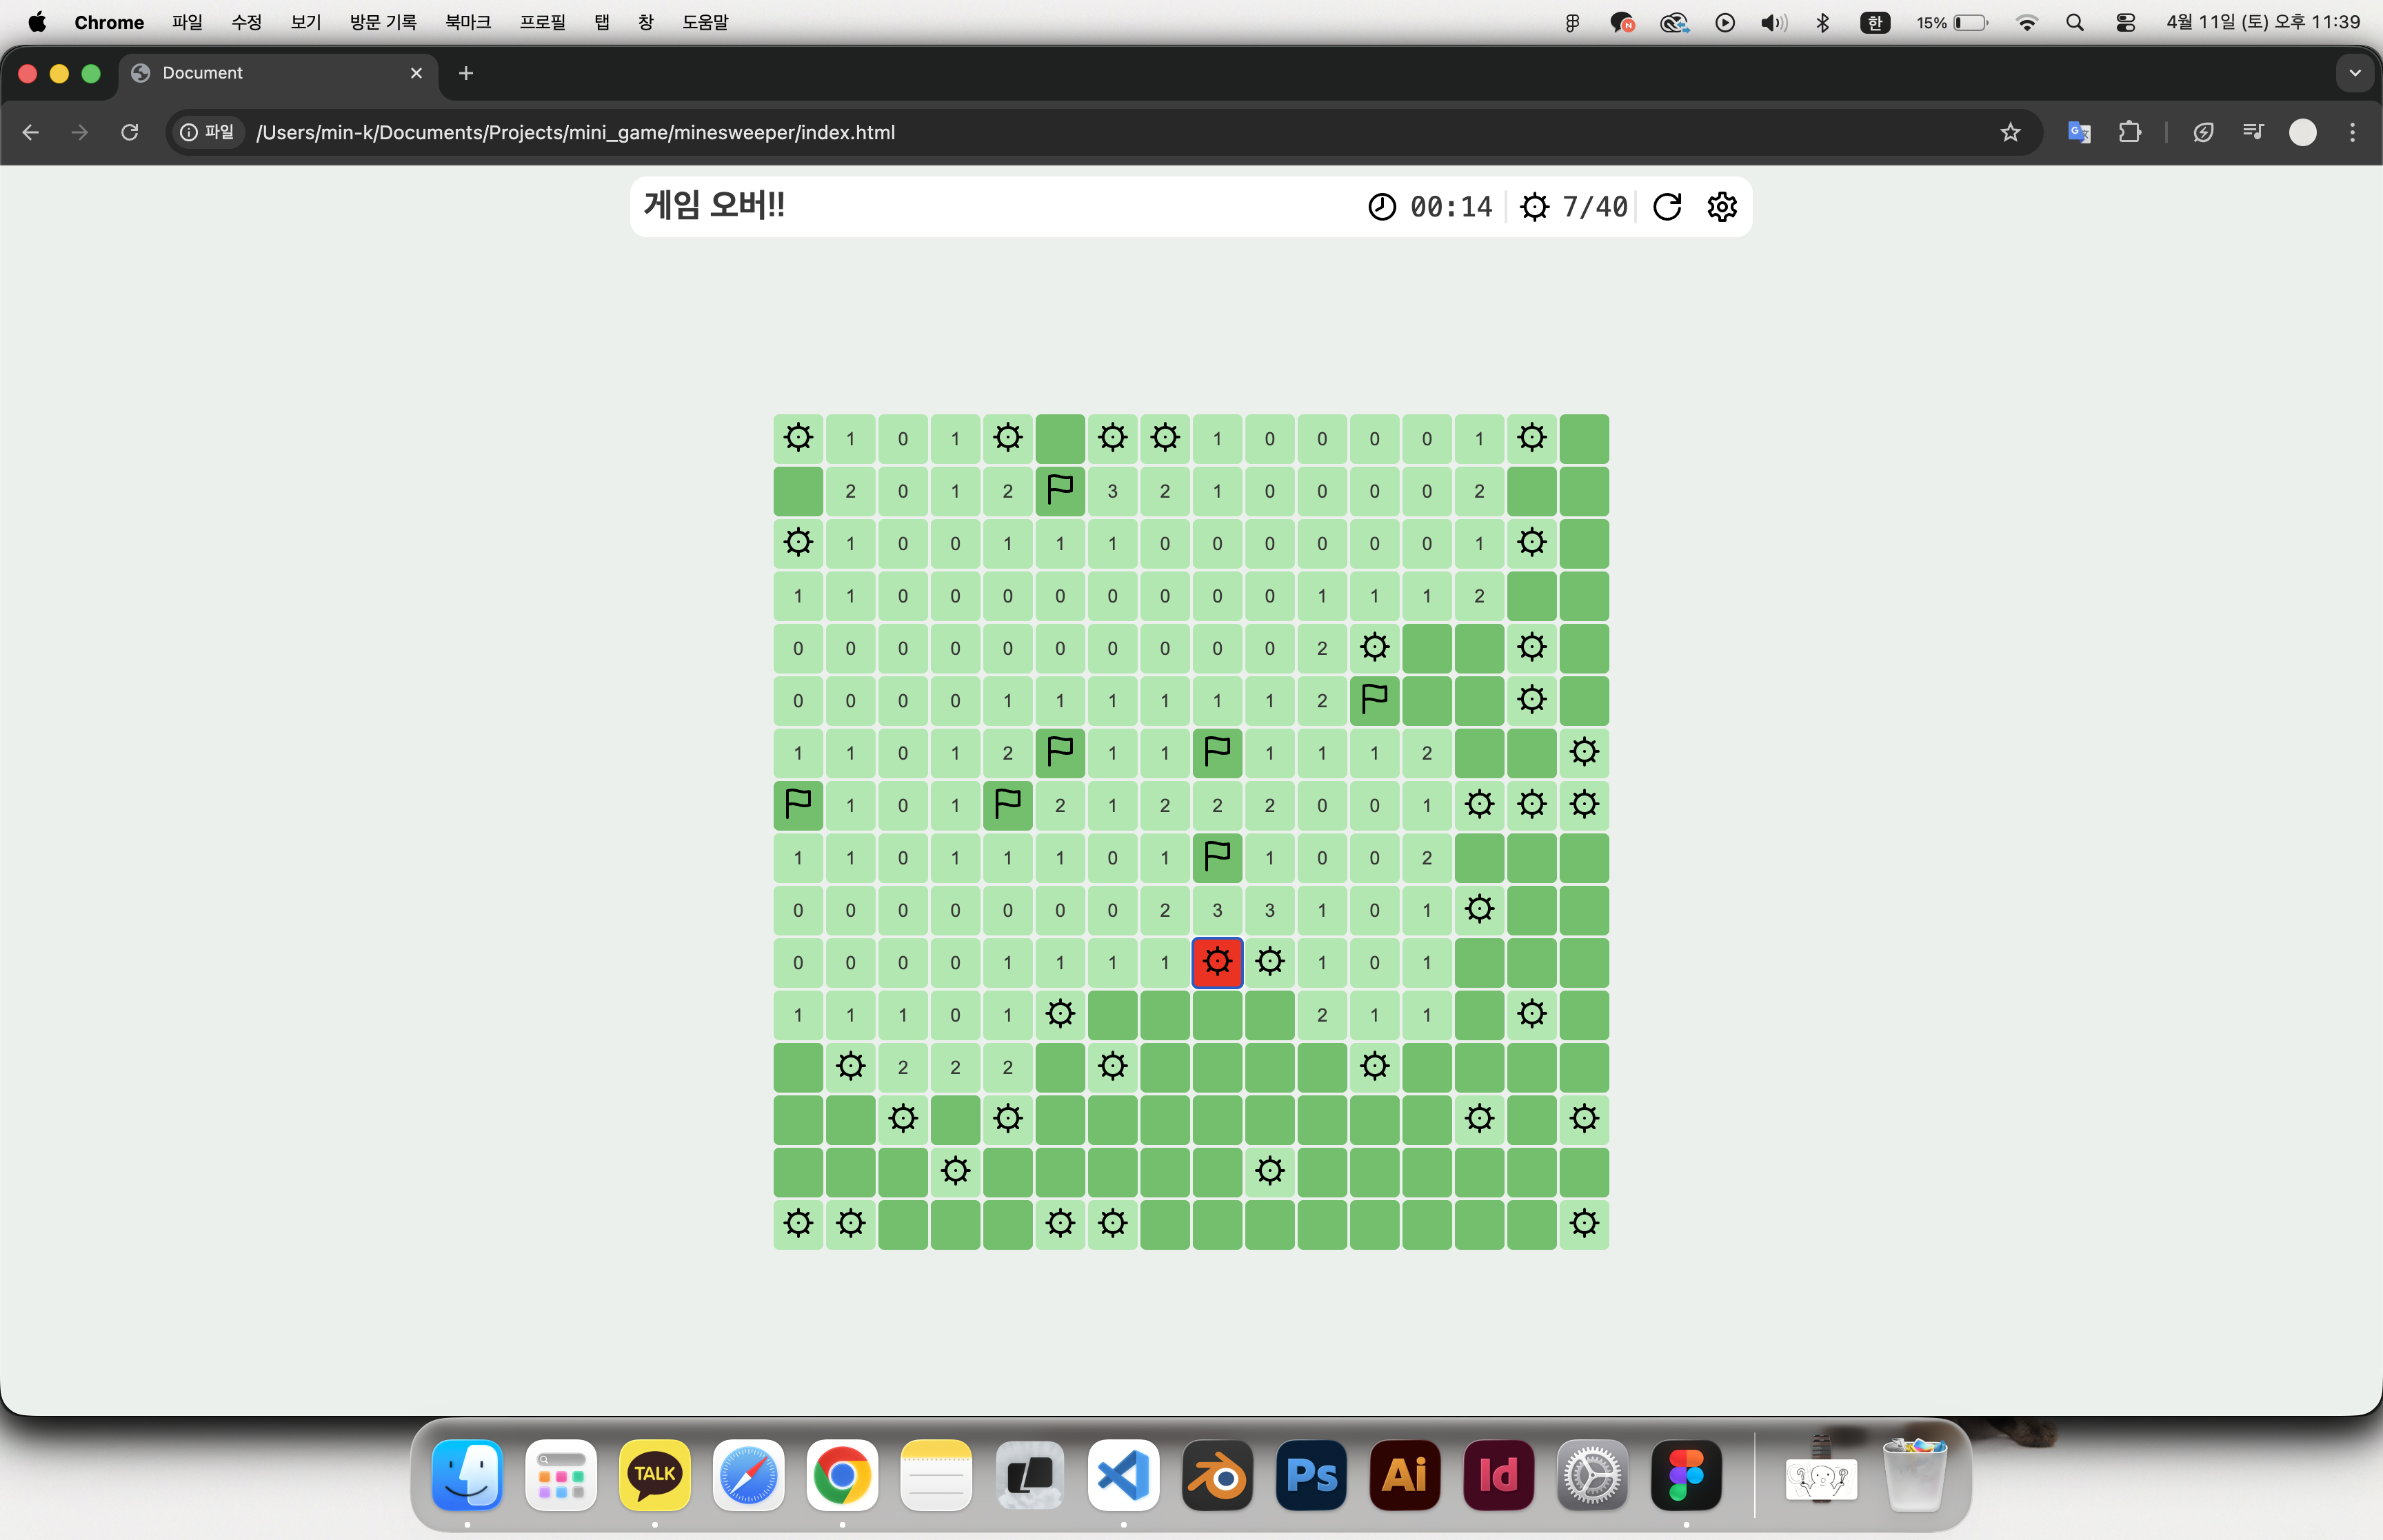 게임 오버...